
Arrow Escape: Complete Guide to Every Level
By JingPublished Updated 16 min read2,914 words
In this guide
This Arrow Escape guide is written from the actual boards, not from general puzzle advice. We pulled every one of the 100 levels out of the game, counted the arrows, and traced which arrow frees which. What follows is the rulebook as the game really applies it, a move-by-move opening for level 1, the three levels that change how the game feels, and a table of the hardest boards by the numbers.
The short version: every board is fully packed, so at the start the only arrows that can leave are the ones whose head already touches the edge and points off it. Clear those, watch what they uncover, and never tap an arrow whose line you have not traced to the edge. The rest of this guide is the evidence for those three sentences.
How an Arrow Escape level actually works
Every level is a rectangle of cells, and every cell belongs to exactly one arrow. An arrow is a path of two or more connected cells with an arrowhead at one end, pointing up, down, left or right. When you tap, the game checks one thing: the straight line from the head to the edge. If every cell on the line is empty, the arrow leaves, and its body follows along its own path and out the same exit. If any cell is occupied, the tap is blocked.
Two consequences follow. First, because the board is packed, an arrow whose head is not on the edge is always blocked at the start, since the cell in front of it belongs to another arrow. On level 1 that leaves 7 arrows that can move; on level 3 it leaves exactly one. Second, an arrow's body never needs a clear line. A 27-cell arrow that snakes across half the board leaves as easily as a 2-cell one once its head is free.
You start each level with four hearts, and a blocked tap costs one. There is one exception, covered in our beginner tips: tapping the same blocked arrow again is free until something else changes. Level 1 has no clock. From level 2 on, the timer is four seconds per arrow, rounded up to a multiple of five seconds, so a 109-arrow board gives you 7:20 and a 241-arrow board gives you 16:05.
The game belongs to the sliding-puzzle family, with one twist. Wikipedia's definition of a sliding puzzle notes that these puzzles prohibit lifting pieces off the board. In Arrow Escape every successful move removes a piece for good, so a board can only get emptier. The question is never whether a board can be cleared, it is how many hearts you spend finding the order.
Level 1: the seven arrows that can move, and what they uncover
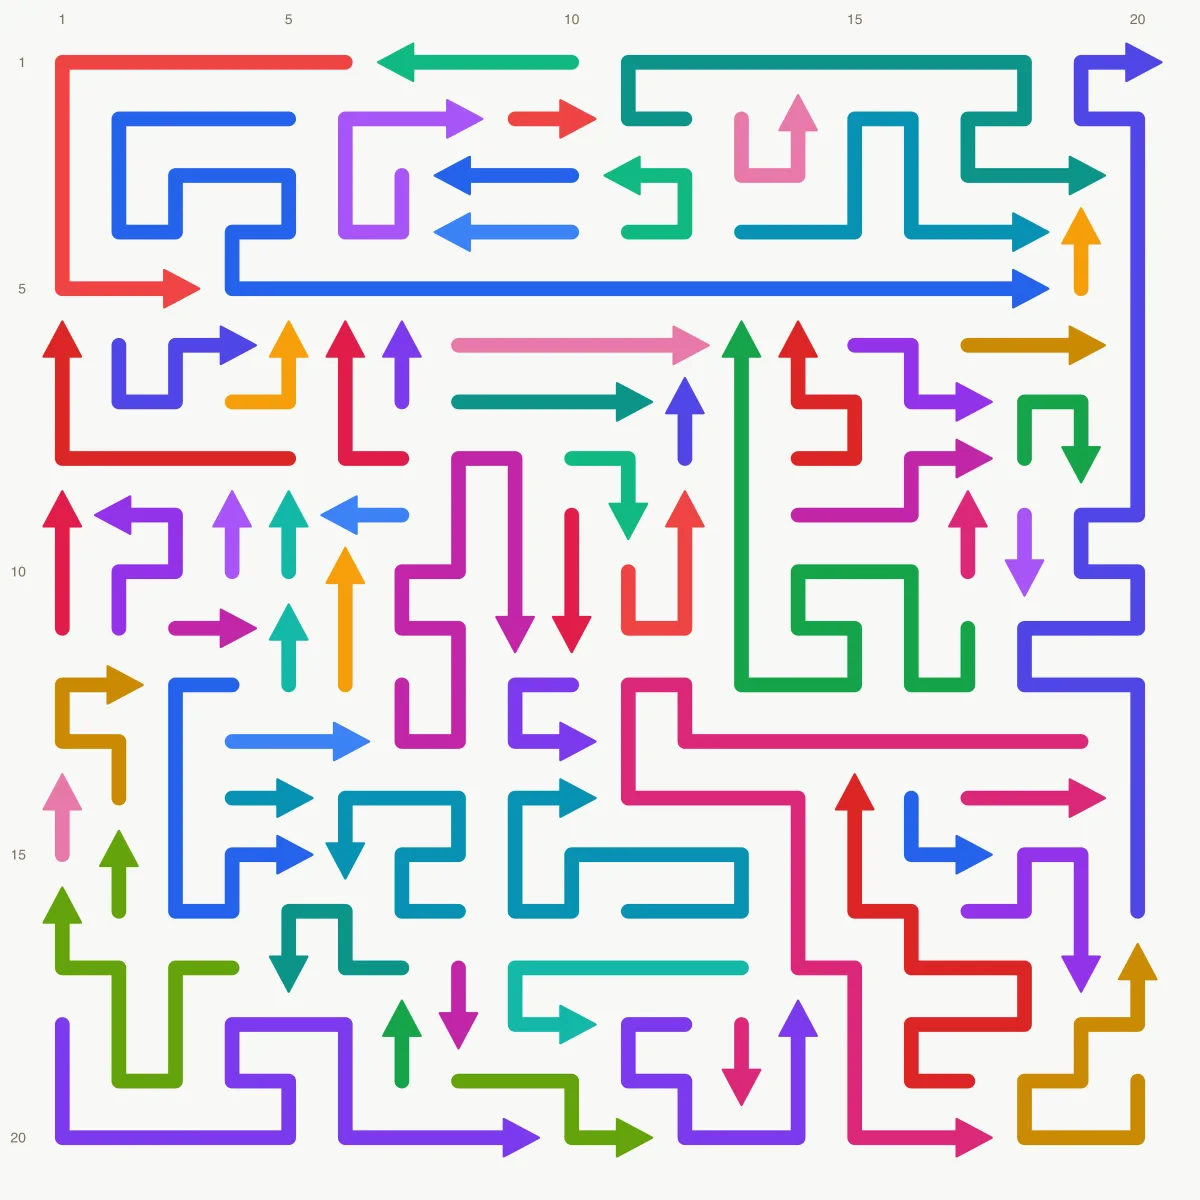
Level 1 is a 15 by 20 board with 47 arrows and no timer. Play it slowly, because it teaches the pattern every later board repeats. Before touching anything, look at the edges. Two arrows have their heads on the top edge pointing up, in the second and fifth columns from the left. Four have heads on the bottom edge pointing down: one in the far-left column and three side by side in the eleventh, twelfth and thirteenth columns.

One more arrow has its head on the right edge pointing right, in the sixth row from the top. Those seven are the only legal first moves, and every other arrow on the board is blocked. Here is the opening we settled on after tracing what each departure uncovers:
- Tap the short arrow on the right edge, sixth row down. It is only 4 cells long, but the three cells it vacates on that row sit directly in front of the longest arrow on the board, a 27-cell snake whose head points right. That giant leaves next and clears a corridor across the upper half.
- Tap the two top-edge arrows. The one in the fifth column frees a 9-cell arrow pointing up directly beneath it. The one in the second column has a body that wraps into the first column, so when it leaves it frees a 4-cell arrow pointing up in the far-left column.
- Tap the four bottom-edge arrows. Two of the three on the right free short downward arrows above them, 3 and 5 cells long, and those in turn uncover a 15-cell one. The arrow in the far-left column frees a 7-cell arrow pointing left along the second row from the bottom.
After those seven moves, 6 more arrows are free, then 4, then 5, then 4, and the board keeps peeling in layers; the whole level takes 21 of them. In the middle there is a stretch of six layers where exactly one arrow can move: a 21-cell arrow pointing down in the top-right region, then a 6-cell arrow pointing up, then a 2-cell one pointing right, and so on. That stretch is where a heart goes if you tap the 18-cell upward arrow two moves early.
Levels 2 to 9: bigger boards, the first square, the first decoration
The warm-up levels grow fast. Level 2 is 17 by 23 with 56 arrows and the first timer, 3:45. Its opening is generous: eight arrows can move at once, five of them on the right edge, and the upward arrow in the top-right corner frees a 17-cell arrow pointing right along the second row. Level 4 jumps to 24 by 31 and 88 arrows, and the boards stay around that size until level 10.
Level 3 is the one that catches people. It is a 20 by 20 square with 65 arrows and 4:20 on the clock, and exactly one arrow can move at the start: a 24-cell snake whose head sits in the top-right corner pointing right, with its body running down the entire right-hand column. Every tap that is not that corner costs a heart. Once it leaves, four arrows on the right edge open up, then four more, and the board widens to eight and ten choices per layer.
Two shape rules start here and repeat through level 99. Every third level that is not a multiple of ten is a square, cut to the smaller side: level 3 is 20 by 20, level 9 is 25 by 25. Every fourth level that is not a multiple of ten or three draws an ellipse-shaped dot pattern behind the board. That pattern is decoration only: the arrows still fill the full rectangle, and the corners of level 4 and level 8 play like any other cell.
| Level | Board | Arrows | Movable at start | Clock |
|---|---|---|---|---|
| 1 | 15 x 20 | 47 | 7 | none |
| 2 | 17 x 23 | 56 | 8 | 3:45 |
| 3 | 20 x 20 square | 65 | 1 | 4:20 |
| 4 | 24 x 31 | 88 | 7 | 5:55 |
| 5 | 24 x 31 | 71 | 5 | 4:45 |
| 6 | 24 x 24 square | 88 | 4 | 5:55 |
| 7 | 24 x 32 | 77 | 9 | 5:10 |
| 8 | 25 x 32 | 84 | 5 | 5:40 |
| 9 | 25 x 25 square | 64 | 6 | 4:20 |
Every tenth level is a bigger board
Level 10 is the first shock: 35 by 49 cells and 162 arrows, more than twice the arrows of level 9, with 10:50 on the clock. Every multiple of ten after it is a board of that class, each slightly larger than the last. Level 20 is 36 by 50 with 171 arrows, level 50 is 39 by 53 with 196, and level 100 is 44 by 58 with 241. The levels in between drop back to normal size, so the game alternates a long climb with a short breather.

The clock scales with the arrow count, and across all ten of these boards it works out to almost exactly four seconds per arrow. Four seconds is enough to find and tap an arrow you already know is free. It is not enough to trace a 40-cell snake and decide whether it is free. On the big boards the winning habit is to keep a queue of arrows you have already confirmed, and to trace the next ones while the current one animates off.
The big boards are also where the longest arrows live: 42 cells on level 10, and 60 cells on level 50. Length says nothing about timing. On level 10 the 42-cell arrow leaves in the third layer of the solve; on level 100 the 49-cell arrow in the bottom-left corner is not free until the 32nd layer out of 77. Trace a giant once so you know where its head is, and let the line in front of that head decide when to tap it.
| Level | Board | Arrows | Movable at start | Longest arrow | Clock |
|---|---|---|---|---|---|
| 10 | 35 x 49 | 162 | 6 | 42 cells | 10:50 |
| 20 | 36 x 50 | 171 | 7 | 41 cells | 11:25 |
| 30 | 37 x 51 | 180 | 7 | 43 cells | 12:00 |
| 40 | 38 x 52 | 192 | 10 | 51 cells | 12:50 |
| 50 | 39 x 53 | 196 | 7 | 60 cells | 13:05 |
| 60 | 40 x 54 | 203 | 5 | 43 cells | 13:35 |
| 70 | 41 x 55 | 212 | 11 | 43 cells | 14:10 |
| 80 | 42 x 56 | 221 | 7 | 39 cells | 14:45 |
| 90 | 43 x 57 | 225 | 5 | 44 cells | 15:00 |
| 100 | 44 x 58 | 241 | 10 | 49 cells | 16:05 |
Level 47: the board that punishes guessing
Level 47 is a 30 by 40 rectangle with 109 arrows and 7:20 on the clock. By arrow count it is an ordinary mid-game level. By structure it is the most sequential board in the game: clearing it takes 56 layers, more than one for every two arrows, and 22 of those layers contain exactly one movable arrow. In those layers there is one correct arrow and, early on, more than a hundred wrong ones.
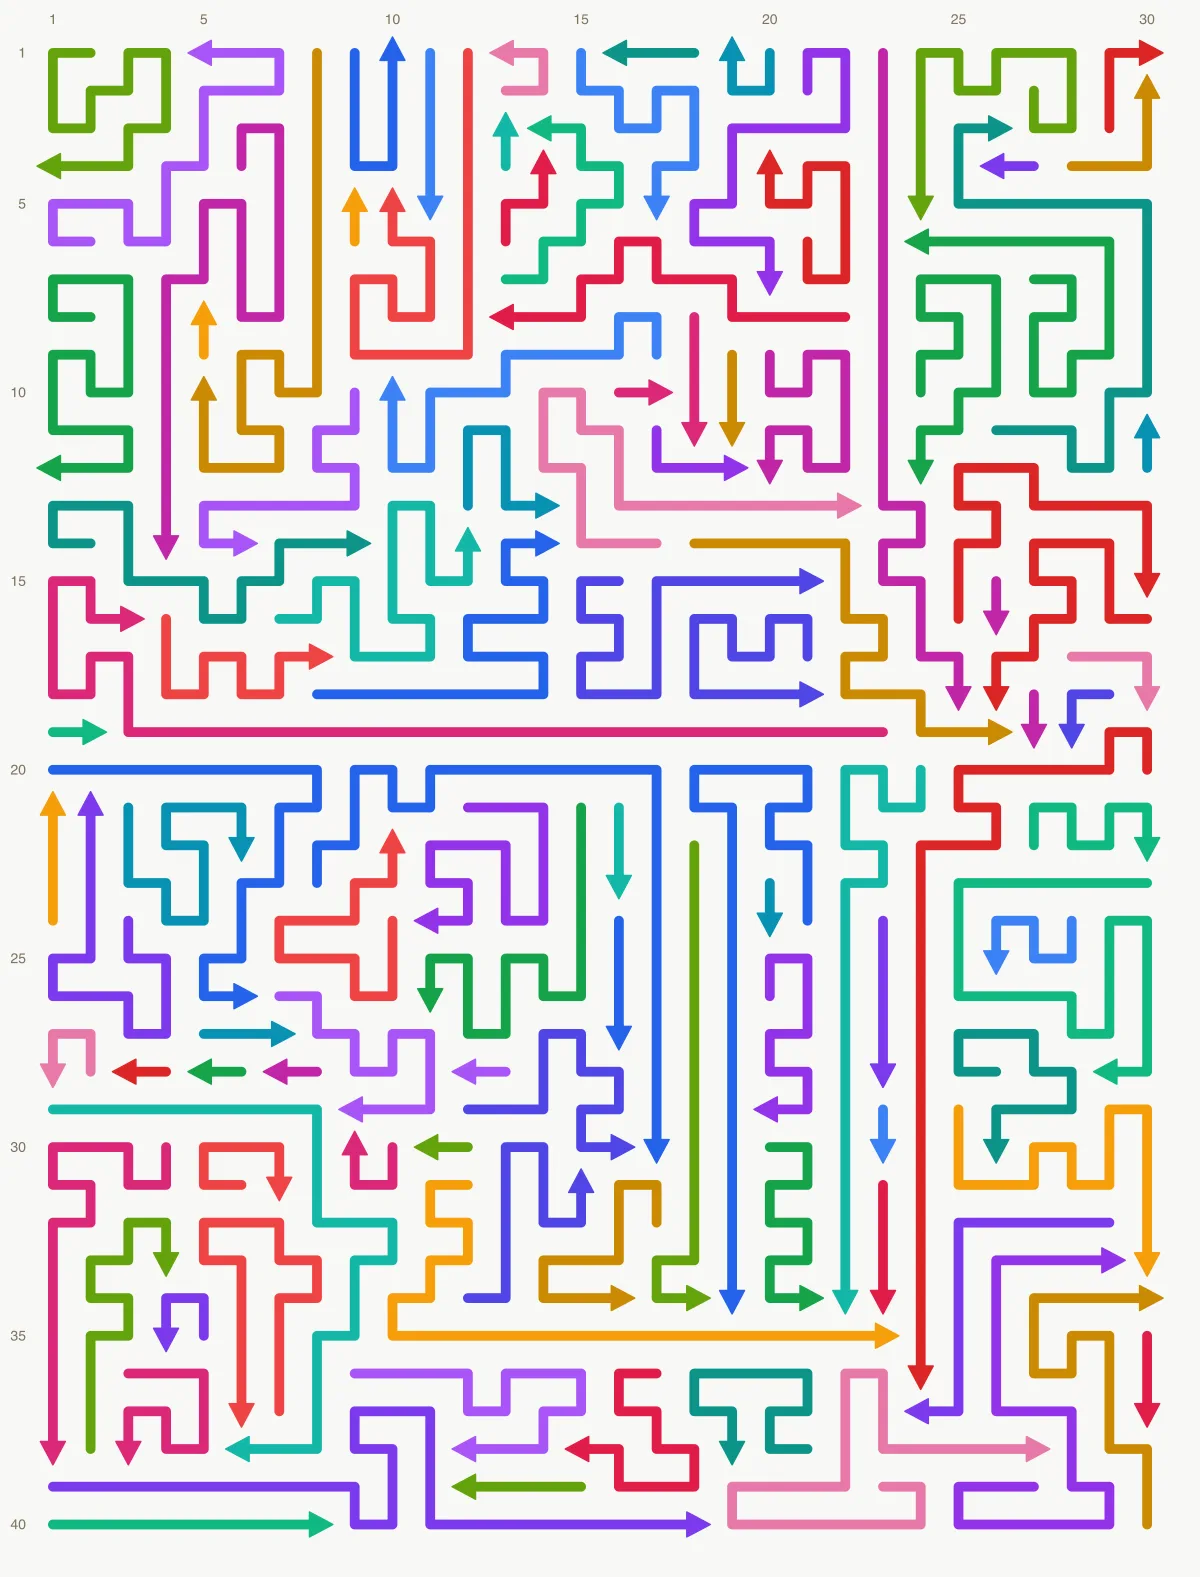
The opening is fine. Six arrows can move: two on the top edge pointing up, in the tenth and nineteenth columns; two on the left edge pointing left, in the fourth and twelfth rows; two on the right edge pointing right, in the first and thirty-fourth rows. The top-edge arrow in the tenth column matters most. It frees a 21-cell arrow pointing up directly beneath it, which frees a 15-cell one, so the left-center opens as a chain from a single tap.
The trouble starts after the first dozen moves, when layers narrow to one arrow at a time. The costliest stretch comes near the end, six single-choice layers in a row: a 4-cell arrow pointing up in the fourth row, then a 17-cell arrow pointing left in the sixth row, then a 15-cell one pointing down beside it, then a 21-cell arrow pointing right in the third row, then a 2-cell arrow pointing up on the right edge, then a 4-cell arrow pointing right in the twelfth row.
The 17-cell arrow is the obvious big move there, and tapping it first costs a heart. The 4-cell arrow has to go first, because its tail sits in the sixth row, eleven cells to the left of the giant's head, right in its lane. The 32-cell arrow on this board, the longest one, is a decoy from start to finish: its head sits in the sixteenth row pointing right, and it does not become free until the 34th layer.
Level 100: clearing a 44 by 58 board inside the clock
Level 100 is the largest board in the game: 44 by 58 cells, 241 arrows, 16:05 on the clock. Ten arrows can move at the start, spread around all four edges: three on the right edge pointing right in rows 34, 40 and 46, one more in the top-right corner pointing right, two on the top edge pointing up, two on the left edge pointing left, and two on the bottom edge pointing down, one of them in the bottom-right corner. Every one of them uncovers something.
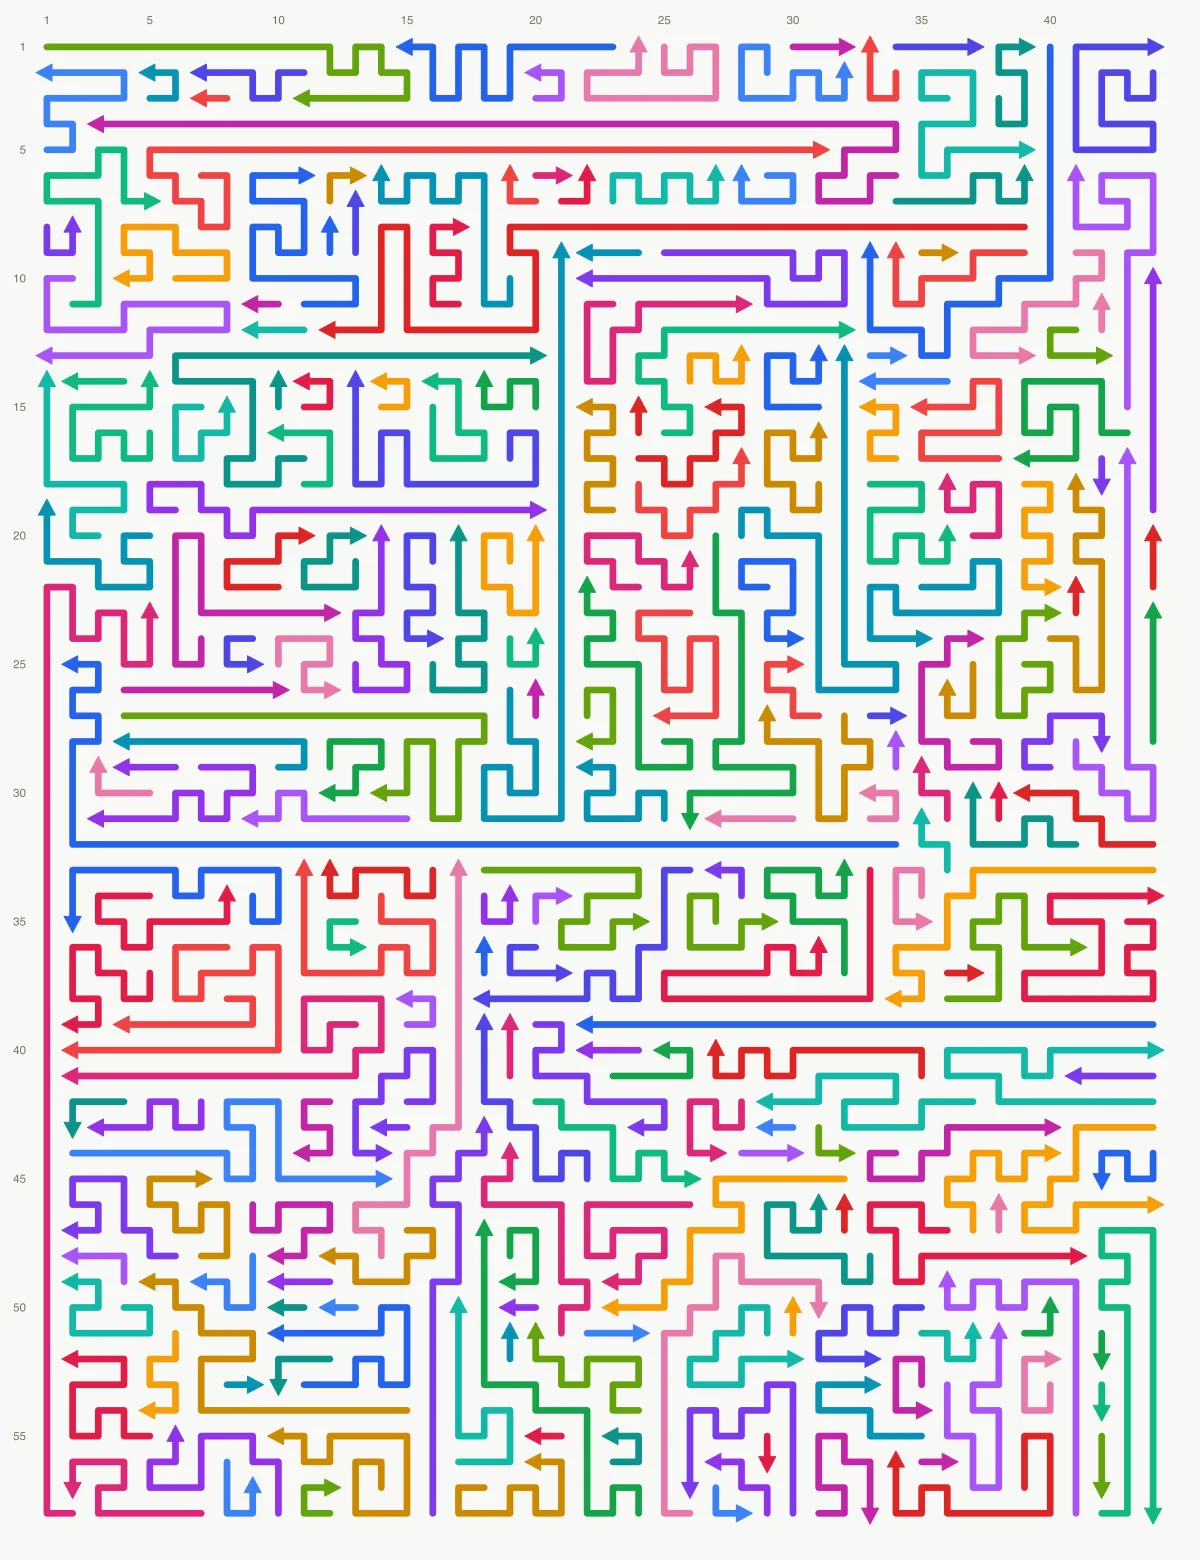
The board then opens in a wide funnel: 8 arrows free in the second layer, then 6, 5, 6, 7, 8. The left-edge arrow on the second row is the one to take early, because it frees a 42-cell arrow pointing left in the fourth row. The right-edge arrow in the first row frees a 20-cell upward arrow, which frees a 10-cell one on the right edge. After eight layers the board narrows to one to three movable arrows per layer for most of the middle game.
The moment to watch for is the 33rd layer. When it arrives, 14 arrows become free at once, then 10 more. It is the reward for clearing the center, and it is also where the clock gets spent, because 24 free arrows means 24 lines to confirm. At four seconds each that is more than a minute and a half of pure tracing. On this board, confirming the next arrow while the current one slides off is the difference between finishing and watching the timer hit zero.
Arrow Escape guide to the hard levels, by the numbers
Two things make a level hard: how few arrows can move at the start, and how sequential the solve is, meaning how many layers it takes relative to the number of arrows. A board with one movable arrow charges a heart for every wrong first tap. A board with fifty single-choice layers charges a heart for every guess in the middle.
By the first measure, level 3 is the hardest opening in the game with a single movable arrow, followed by levels 39 and 96 with two each, and levels 16, 36 and 89 with three. The typical opening across all 100 levels has five to seven movable arrows, so one or two is a genuine spike. By the second measure, level 47 leads with 56 layers for 109 arrows, then level 18 with 40 for 80, level 11 with 44 for 96, and level 92 with 77 for 176.
Two honest notes. The clock is never the constraint on paper: four seconds per arrow is enough on every board if you only tap confirmed arrows, and the two-minute floor never applies because no board has fewer than 47 arrows. And there is no formula to shortcut the reading: Hearn and Demaine showed that classic unrestricted sliding-block puzzles are PSPACE-hard even with domino pieces. Arrow Escape is friendlier, since pieces only ever leave, but the order still has to be found by looking.
| Level | Why it is hard | Numbers |
|---|---|---|
| 3 | One movable arrow at the start | 65 arrows, 1 movable, 14 layers |
| 11 | Long sequential middle | 96 arrows, 44 layers |
| 18 | Long sequential middle | 80 arrows, 40 layers |
| 39 | Two movable arrows at the start | 87 arrows, 2 movable, 33 layers |
| 47 | Most sequential board in the game | 109 arrows, 56 layers, 22 single-choice |
| 92 | Longest solve outside the tens boards | 176 arrows, 77 layers |
| 96 | Two movable arrows at the start | 137 arrows, 2 movable, 52 layers |
What to read next
Everything above comes down to one reading skill: finding the arrows whose line to the edge is clear right now, and predicting which arrows the next departure will free. The tables give you the map of where the game gets harder, but the skill itself is built on the small boards, where a mistake costs a heart and nothing else. Play those slowly; the big boards reward the same habits at speed.
If you are new to the game, our Arrow Escape tips for beginners turn that skill into three habits you can practice on levels 1 and 2 before the clock starts to matter, and they explain the heart rule that most players learn the expensive way. For the levels in the table above, how to beat hard Arrow Escape levels gives the real openings, and seven common Arrow Escape mistakes catalogues what each habit costs when it slips.
The same exit rule runs two more games here: Arrow Escape vs Traffic Escape says what changes when arrows become vehicles, and the Arrow Puzzle Tap Away guide covers the picture-shaped version with one tile per arrow and three hearts. Why a board this strict about sequence never traps you is in why move order decides arrow puzzles. Beyond this game, how to solve traffic jam puzzles is the reference for the wider family, and do puzzle games improve your brain asks whether the practice carries anywhere else.
Every board from level 1 to 100, with its first move and a full solution played through in the game, is in the Arrow Escape level solutions.
If you would rather test the guide than read more of it, play Arrow Escape from level 1 and try the seven-move opening above. When you reach level 3, remember the corner. When you reach level 47, remember the decoy. And if you want to know why those two levels feel the way they do, what makes a good puzzle level measures every level in the game by the same numbers.
arrow escapepuzzle strategywalkthrough
Play the game

Frequently asked questions
- Why am I stuck on Arrow Escape level 3?
- Level 3 is the first square board and only one arrow can move when it starts: the long arrow in the top-right corner whose head points right. Every other arrow is blocked until that one leaves. Tap it first, then work down the right edge where four more arrows open up.
- How many levels does Arrow Escape have?
- There are 100 levels. Boards grow from 15 by 20 cells on level 1 to 44 by 58 on level 100, and every tenth level is a much larger board than its neighbors. Level 1 has no timer; from level 2 onward every board is played against a clock.
- Is the timer the same on every Arrow Escape level?
- No. From level 2 on, the clock is four seconds per arrow on the board, rounded up to the next five seconds, with a floor of two minutes. Level 47 has 109 arrows and starts at 7:20; level 100 has 241 arrows and starts at 16:05.
Sources
- Sliding puzzle — Wikipedia (Accessed June 29, 2026)
- PSPACE-Completeness of Sliding-Block Puzzles and Other Problems through the Nondeterministic Constraint Logic Model of Computation — Erik Demaine, Theoretical Computer Science (2005) (Accessed June 29, 2026)
External links are provided for reference and are not endorsements.