
How to Beat Hard Arrow Escape Levels Without Hints
By JingPublished Updated 11 min read1,965 words
In this guide
Hard Arrow Escape levels are hard for one of two measurable reasons, and knowing which one you are facing is most of the solution. Either very few arrows can move at the start, so every guess before the first correct tap costs a heart, or the board is sequential, with long stretches where exactly one arrow is free and every other tap is wrong. Both can be read off the board before you touch it.
This guide names the levels where each problem is worst, gives the real opening for the three hardest starts, shows what a single-choice stretch looks like on levels 11 and 18, and ends with a six-step method that does the job a hint button would do. Every number below comes from the boards themselves, not from memory of playing them.
What makes hard Arrow Escape levels hard
Every board is completely packed, so at the start the only arrows that can move are the ones whose head already sits on an edge pointing off it. Across the 100 levels the typical opening has five to seven such arrows. When a level has one or two, the opening is a minefield: on level 3, with 65 arrows and one movable, a random first tap loses a heart 98 percent of the time.
The second measure is how the board peels. If you remove every free arrow, look again, and repeat, the number of rounds is the depth of the level, and the width of each round is how much choice you have. A round with one free arrow is a single-choice layer. The average level has about eleven of them; 59 of the 100 levels have ten or more; level 86 has 27. On those layers there is one right tap and dozens of wrong ones.
| Level | Board | Arrows | Movable at start | Single-choice layers | Clock |
|---|---|---|---|---|---|
| 3 | 20 x 20 | 65 | 1 | 2 | 4:20 |
| 11 | 25 x 32 | 96 | 5 | 20 | 6:25 |
| 18 | 26 x 26 | 80 | 5 | 17 | 5:20 |
| 39 | 29 x 29 | 87 | 2 | 7 | 5:50 |
| 47 | 30 x 40 | 109 | 6 | 22 | 7:20 |
| 89 | 37 x 48 | 159 | 3 | 14 | 10:40 |
| 92 | 37 x 49 | 176 | 8 | 25 | 11:45 |
| 96 | 38 x 38 | 137 | 2 | 13 | 9:10 |
Neither kind of difficulty can make a level impossible. An arrow that leaves only empties cells, so an arrow that is free now stays free until you tap it. That is the difference between this game and a sliding puzzle like Rush Hour, where the goal is to get one car out by moving the others and a bad sequence can block you. Here a bad sequence only spends hearts and clock.
Level 3: one movable arrow and a heart for every wrong guess
Level 3 is a 20 by 20 square with 65 arrows, 4:20 on the clock, and exactly one legal first move. The arrow is in the top-right corner: its head is on the top row pointing right, and its 24-cell body runs down the entire right-hand column. Nothing else can move. Sixty-four arrows are waiting on that one, and each of them costs a heart if tapped first.
Once it leaves, the right side opens. Four arrows become free at once, all with heads in the nineteenth or twentieth column: a 15-cell arrow pointing right in row 3, two 3-cell arrows pointing right in rows 6 and 14, and a 9-cell arrow pointing up in row 17. From there the board widens fast, to five, six, eight and ten free arrows per layer, and the 27-cell arrow that dominates the middle leaves in the fourth layer. Level 3 is hard for exactly one tap.
The lesson generalizes. When a level looks impossible at the start, scan the four edges for an arrowhead that points off the board. On a packed board that is the only kind of arrow that can move, and there is always at least one. The guide to every level lists the count for the first nine levels and every tenth level.
Levels 39 and 96: two movable arrows, both easy to miss
Level 39 is a 29 by 29 square with 87 arrows and 5:50. Two arrows can move: a 4-cell arrow on the top edge in the thirteenth column, and a 22-cell arrow whose head sits in the bottom-left corner pointing left. The corner arrow is the productive one. When it leaves, two 17-cell arrows pointing down become free in the lower-left, in the first and fifth columns, while the top-edge arrow frees only a 2-cell arrow beneath it.
Level 96 is bigger, 38 by 38 with 137 arrows and 9:10, with two movable arrows, both on the top edge: a 34-cell arrow in the top-left corner and a 3-cell arrow in the seventeenth column. The corner arrow again does the work: its body runs down the first column, and when it leaves it frees three arrows pointing left in the second column, in rows 1, 16 and 30. It also has a five-layer single-choice stretch along its bottom row.
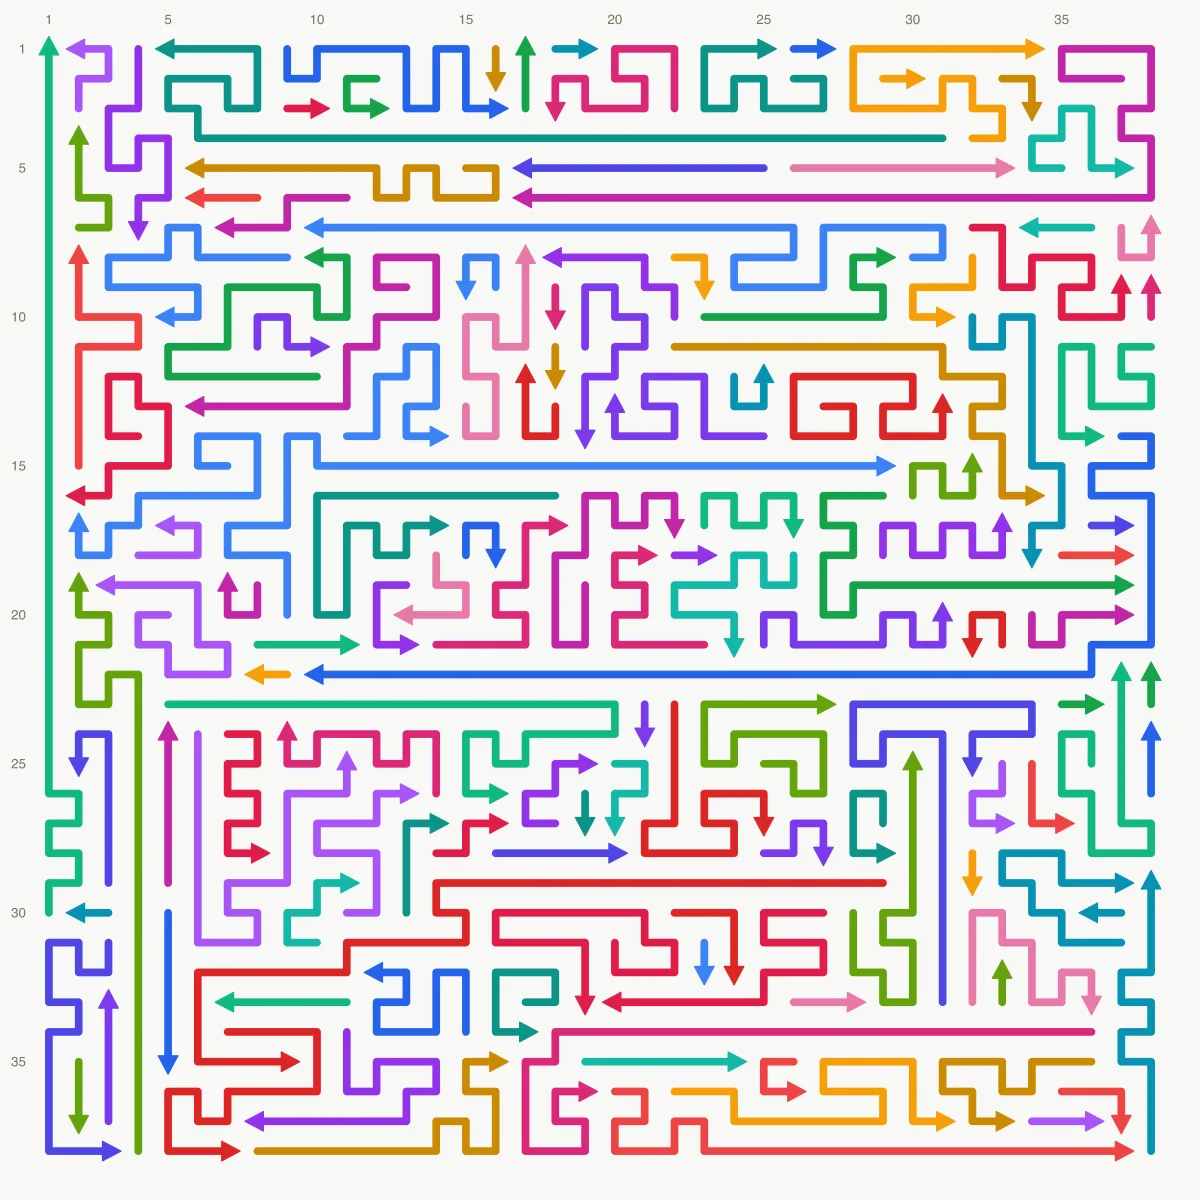
The pattern in both levels is that a long arrow lying along an edge acts as a wall. Its head is free, but its body blocks a whole column of arrows that point toward that edge. Remove the wall and the column opens. Corner heads are worth checking first on any board, because a corner arrow with its body along an edge is usually holding more arrows than any other single piece.
Single-choice stretches: level 11's row and level 18's edge
Level 11 has 96 arrows, 6:25, and 20 single-choice layers, nearly one for every five arrows. Its longest stretch is seven layers, and the middle of it is a lesson in reading chains. Along the fourteenth row from the top sit four 2-cell arrows pointing right, with heads in the seventeenth, eleventh, seventh and third columns. They can only leave from right to left: the one at column 17 first, then column 11, then 7, then 3, because each one's line runs through the cells the previous one occupied.

Tap them in any other order and the tap is blocked. That is what a single-choice stretch looks like in practice: not a hard read, but a strict order, where the only clue to the next arrow is the cells that just emptied.
Level 18, a 26 by 26 square with 80 arrows, has 17 such layers, and its longest stretch runs six layers up the right-hand column: three arrows pointing up with heads in rows 18, 23 and 25 of the last column, then an 18-cell arrow pointing down in the column beside them, then two more a few columns further in.
The habit that clears these stretches is the same on both boards. After every successful tap, look at the cells that just emptied and find the arrowhead pointing into the nearest of them. On a single-choice layer that arrow is the only free one on the board. The beginner tips call this following the chain, and it matters more on hard levels than anywhere else.
The tens boards: wide openings, long clocks
Every level that is a multiple of ten is a much larger board, and they are hard in a third way. Level 10 has 162 arrows, more than twice level 9, with 10:50 on the clock. But its opening is generous: six free arrows, then seven, nine, ten and ten in the following layers, and only four single-choice layers in the whole solve. The 42-cell arrow, the longest on the board, leaves in the third layer.
So the tens boards are not sequential; they are wide and slow. The difficulty is scanning 35 by 49 cells for the next free head, and the clock works out to four seconds per arrow, which is enough to tap a confirmed arrow and not enough to hunt for one. The method for these boards is a queue: keep two or three confirmed arrows in mind, tap one, and trace the next while it animates off.
Level 100, the largest at 44 by 58 with 241 arrows, adds one twist: after a wide opening it narrows to one to three free arrows per layer for most of the middle, then opens again with 14 free arrows at the 33rd layer. Wide boards can still hide single-choice stretches, and the level's 49-cell arrow in the bottom-left corner stays blocked until layer 32.
A method that replaces hints
Arrow Escape has no hint button, and the reason none is needed is that every hard situation above has the same structure. Here is the method, in the order to apply it:
- Before the first tap, scan the four edges for arrowheads pointing off the board. Those are the only legal moves. Tap the one in a corner first if there is one.
- Trace the whole line from a head to the edge before tapping. On level 47 the average line crosses five other arrows; on level 100, eight. A line that looks clear near the head is not clear.
- After each exit, look at the cells that emptied and find the arrowhead pointing into the nearest one. On a single-choice layer that is the only move.
- If a tap is blocked, do not try a neighbor. Follow the flashed arrow's line to the first occupied cell; the arrow there is your target, or is blocked by the arrow that is. Tapping the same blocked arrow again costs nothing.
- Judge arrows by their heads, not their length. The longest arrow leaves in the first quarter of the solve on 56 of the 100 levels and after halfway on 17; its size tells you nothing.
- When hearts run out with most of the board cleared, take the single heart rather than retry. Retry restores everything but resets your streak; one heart on a half-empty board is usually enough.
None of this is a trick. Why order matters in the first place, and why a board can be this strict about it without ever becoming impossible, is the subject of the article on move order. Hearn and Demaine showed that general sliding-block puzzles are PSPACE-hard even with domino pieces; Arrow Escape is gentler because pieces only leave, but the reading still has to be done by eye.
What to read next
The mistakes that cost the most hearts on hard levels are catalogued, with fixes, in seven common Arrow Escape mistakes, and most of them are the six steps above done in the wrong order. For the full map of the game, including the board sizes, clocks and openings of every tenth level, the complete guide is the reference. The numbers behind the table above, and what they say about which levels are well made, are in what makes a good puzzle level.
If you want to test the method on the hardest opening in the game, play Arrow Escape and go to level 3. There is one arrow that can move; find it without tapping anything else, and you have already learned the habit that clears the rest.
And if the table above made you wonder how a board can be that strict about order without ever becoming impossible, that question has a precise answer, and it is the reason none of the levels here needs a hint: the board only ever gets emptier, so the only thing a wrong order can cost is hearts. The puzzles where a wrong order can cost the level are the sliding kind, and why traffic puzzles are mathematically hard explains what separates them from this one.
arrow escapehard levelspuzzle strategy
Play the game

Frequently asked questions
- Which Arrow Escape levels are the hardest?
- By the numbers, level 3 has the hardest opening with a single movable arrow, followed by levels 39 and 96 with two each. Level 47 is the most sequential board, with 22 layers where only one arrow can move. Levels 11, 18 and 92 also have long one-choice stretches. Every tenth level is a much larger board.
- Is there a hint button in Arrow Escape?
- No. The game gives you four hearts, a clock from level 2 onward, and the option to retry or accept one heart back when they run out. There is no hint system, which is why reading the board is the whole skill. This guide replaces hints with a method that works on every level.
- Can an Arrow Escape level become unsolvable?
- No. Every arrow that leaves only empties cells, so an arrow that can move now can still move later. A wrong order never traps you; it only costs hearts and time. Every one of the 100 levels can be cleared from any position, which is what makes the method below safe to follow.
Sources
- Rush Hour (puzzle) — Wikipedia (Accessed July 24, 2026)
- PSPACE-Completeness of Sliding-Block Puzzles and Other Problems through the Nondeterministic Constraint Logic Model of Computation — Erik Demaine, Theoretical Computer Science (2005) (Accessed July 24, 2026)
External links are provided for reference and are not endorsements.